라즈베리 파이로 DHT22 온도 습도 센서 사용하기 C 언어
DHT22 온습도 센서를 라즈베리 파이에 연결해보자.
PIN 맵을 살펴보면 아래 그림과 같다.

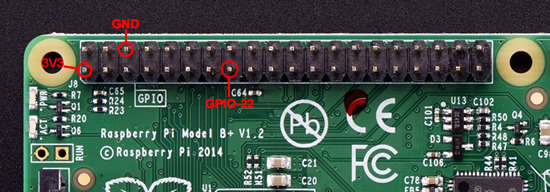
1번은 +5V 에 연결하고, GND 는 GND 에 연결한다. 2번 데이터 핀은 GPIO 어디에나 연결 가능하다. wiringPi 핀번호와 소프트웨어에서 핀 번호를 일치시켜 주면 된다.
테스트는 VCC 1번 핀과 데이터 핀 2번 핀 사이에 10K 저항을 달지 않고 테스트 했는데 이상없이 데이터가 잘 나온다.
DHT22 센서의 간단한 사양은 아래와 같다.
DHT22 MODULE
Power: DC 3~5V
Pins: G (GND) – V (VCC) – D (Data)
Humidity Measurement: 0~100% humidity reading with 2~5% accuracy
Temperature Measurement: -40~125°C temperature reading with ±0.5°C accuracy
Should not measure more than once in every two seconds
연결은 다음과 같이 연결한다


nano 에디터를 사용해서 소스코드를 입력한다
$nano dht22temp.c
소스코드는 아래와 같다.
|
1
2
3
4
5
6
7
8
9
10
11
12
13
14
15
16
17
18
19
20
21
22
23
24
25
26
27
28
29
30
31
32
33
34
35
36
37
38
39
40
41
42
43
44
45
46
47
48
49
50
51
52
53
54
55
56
57
58
59
60
61
62
63
64
65
66
67
68
69
70
71
72
73
74
75
76
77
78
79
80
81
82
83
84
85
86
87
88
89
90
91
92
93
94
95
96
97
98
99
100
101
102
103
104
|
/*
* dht.c:
* read temperature and humidity from DHT11 or DHT22 sensor
*/
#include <wiringPi.h>
#include <stdio.h>
#include <stdlib.h>
#include <stdint.h>
#define MAX_TIMINGS 85
#define DHT_PIN 11 /* GPIO-22 */
int data[5] = { 0, 0, 0, 0, 0 };
void read_dht_data()
{
uint8_t laststate = HIGH;
uint8_t counter = 0;
uint8_t j = 0, i;
data[0] = data[1] = data[2] = data[3] = data[4] = 0;
/* pull pin down for 18 milliseconds */
pinMode( DHT_PIN, OUTPUT );
digitalWrite( DHT_PIN, LOW );
delay( 18 );
/* prepare to read the pin */
pinMode( DHT_PIN, INPUT );
/* detect change and read data */
for ( i = 0; i < MAX_TIMINGS; i++ )
{
counter = 0;
while ( digitalRead( DHT_PIN ) == laststate )
{
counter++;
delayMicroseconds( 1 );
if ( counter == 255 )
{
break;
}
}
laststate = digitalRead( DHT_PIN );
if ( counter == 255 )
break;
/* ignore first 3 transitions */
if ( (i >= 4) && (i % 2 == 0) )
{
/* shove each bit into the storage bytes */
data[j / 8] <<= 1;
if ( counter > 16 )
data[j / 8] |= 1;
j++;
}
}
/*
* check we read 40 bits (8bit x 5 ) + verify checksum in the last byte
* print it out if data is good
*/
if ( (j >= 40) &&
(data[4] == ( (data[0] + data[1] + data[2] + data[3]) & 0xFF) ) )
{
float h = (float)((data[0] << 8) + data[1]) / 10;
if ( h > 100 )
{
h = data[0]; // for DHT11
}
float c = (float)(((data[2] & 0x7F) << 8) + data[3]) / 10;
if ( c > 125 )
{
c = data[2]; // for DHT11
}
if ( data[2] & 0x80 )
{
c = -c;
}
float f = c * 1.8f + 32;
printf( "Humidity = %.1f %% Temperature = %.1f *C (%.1f *F)\n", h, c, f );
}else {
printf( "Data not good, skip\n" );
}
}
int main( void )
{
printf( "Raspberry Pi DHT11/DHT22 temperature/humidity test\n" );
if ( wiringPiSetup() == -1 )
exit( 1 );
while ( 1 )
{
read_dht_data();
delay( 2000 ); /* wait 2 seconds before next read */
}
return(0);
}
|
cs |
컴파일 명령
$ gcc -o dht22temp dht22temp.c -lwiringPi
실행을 하면 결과가 잘 나온다.
$sudo ./dht22temp
Raspberry Pi DHT11/DHT22 temperature/humidity test
Humidity = 77.3 % Temperature = 31.3 *C (88.3 *F)
Humidity = 25.7 % Temperature = 28.6 *C (83.5 *F)
Humidity = 25.7 % Temperature = 28.6 *C (83.5 *F)
Humidity = 25.7 % Temperature = 28.6 *C (83.5 *F)
Data not good, skip
Humidity = 25.7 % Temperature = 28.6 *C (83.5 *F)
한가지 의문점은 DHT11 과 DHT22 온습도 센서의 소스코드가 같은것인지 의문점.
코드와 이미지 출처
1. http://www.uugear.com/portfolio/read-dht1122-temperature-humidity-sensor-from-raspberry-pi/
2. http://webnautes.tistory.com/990
'라즈베리파이' 카테고리의 다른 글
| 한국산업기술 대학교 재직자 대상 파이선 강의, 꼭 수강하세요. (0) | 2019.11.26 |
|---|---|
| 라즈베리파이 기반 IoT(사물인터넷) 설계 실습 과정 (0) | 2019.11.24 |
| 라즈베리파이와 MCP3208 ADC 컨버터 사용하기 - 회로와 소스코드 (0) | 2019.10.16 |
| 라즈베리파이3 B+ 스텝모터 컨트롤 with Python (0) | 2019.10.12 |
| 라즈베리파이 3 B+ RGB Led 구현 with C (0) | 2019.10.12 |


